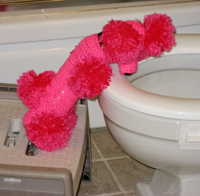
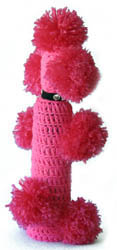
 Thanks to the efforts of authors Leah Kramer and Jo Packham, instructions are available for reproducing vintage poodle-shaped toilet paper covers. However, their lesser known cousin, the farting poodle air freshener cover, remains rare as a service to the more demented of our readers, Tacky Living has developed our own version of this classic kitsch craft. Thanks to the efforts of authors Leah Kramer and Jo Packham, instructions are available for reproducing vintage poodle-shaped toilet paper covers. However, their lesser known cousin, the farting poodle air freshener cover, remains rare as a service to the more demented of our readers, Tacky Living has developed our own version of this classic kitsch craft.
Like the classic toilet paper cozy, this friendly-looking poodle disguises a mundane bathroom supply, an air freshener which is balanced upside down on its spraying end. But the cover also hides a special surprise: when you press the button on the air freshener can, a fine aromatic mist emerges from the poodle’s bottom. Pure bathroom magic!
This poodle would make a fine companion for your existing poodle toilet paper cover or an elegant accent for the family throne all by itself. Whip up several and you’ll never be caught short at housewarmings and other gift-giving occasions.
Other resources:
You may also enjoy this blog which shows the cover of a vintage crochet book featuring poodle novelties.
Onward to the instructions …
Supplies:
- Size G or H crochet hook
- 1 4 oz skein yarn in desired poodle color
- Large-eyed needle
- The eye needs to be large enough to accept the yarn. A needle threader may be helpful.
- 2 wiggly eyes, black buttons, or faux animal eyes
- Small amount black yarn or button or faux animal nose
- In our example, the nose is created with black yarn. However, such a small amount is used that you may prefer to substitute a button or faux nose instead of purchasing an entire skein of black yarn.
- Pillow stuffing
- 1 sheet black felt
- Rhinestones or sequins
- Glue gun or E6000
- 1 can air freshener which can be balanced on its spray end
- Finding this may be the hardest part of the whole project! Of course, you could simply put the poodle cover on a can which is right side up, but then you’d have to remove the cover each time you sprayed air freshener. It also wouldn’t be a genuine Farting Poodle.
Instructions
Poodle body:
- Rnd 1: Starting at the center top, ch 4. Join with sl st to form ring.
- Rnd 2: Ch 4, (dc in ring, ch 1) 11 times. Join to 3rd ch of ch 4 with sl st.
- Rnd 3: Ch 1. 2 sc in each dc. Join to ch 1 at beg of rnd with sl st.

- Rnd 4 – 15: Ch 3. 1 dc in each sc. Join to 3rd ch at beg of rnd with sl st.
- You may need fewer or more rows than we needed. As you work, compare the length of your poodle with your air freshener to ensure that you have the right number of rows.
- Cut yarn and fasten off at end of last rnd.
Head:
The head is worked in a spiral with no chains or joins to the previous row. To keep track of rows, mark the end of each one with a stitch marker or a safety pin.
- Rnd 1: Starting at the center top, ch 2. Make 6 sc in 2nd ch from hook.
- Rnd 2: 2 sc in each sc of rnd 1 (Total 12 sts)
- Rnd 3: *sc in 1st sc, 2 sc in next sc (1 sc increased). Repeat from * around. (Total 18 sts)
- Rnd 4: *1 sc in next 2 scs, then 2 sc in next sc. Repeat from * around. (Total 24 sts)
- Rnd 5: *1 sc in next 3 scs, then 2 sc in next sc. Repeat from * around. (Total 30 sc)
- Rnds 6 – 9: 1 sc in each sc of the previous round, worked even
- Rnd 10: *1 sc in next 3 scs, then dec over next 2 scs. Repeat from * around. (Total 24 sts)
- Rnd 11: *1 sc in next 2 scs, then dec over next 2 scs. Repeat from * around. (Total 18 sts)
- Rnd 12: *1 sc in next sc, then dec over next 2 scs. Repeat from * around. (Total 12 sts)
- Cut yarn and fasten off at end of last rnd.
Snout:
As with the head, the snout is worked in a spiral. To keep track of rows, mark the end of each one with a stitch marker or a safety pin.
If you have black yarn …
- Rnd 1: Starting at the nose, with black yarn, ch 2. Make 6 sc in 2nd ch from hook. Cut yarn and fasten off.
- Rnd 2: Tie main poodle color to yarn end. 2 sc in each sc of rnd 1. (12 sts).
- Rnd 3-6: 1 sc in each sc of the previous round, worked even. Cut yarn and fasten off at end of last rnd
If you don’t have black yarn …
- Rnd 1: ch2. Make 6 sc in 2nd ch from hook.
- Rnd 2: 2 sc in each sc of rnd 1. (12 sts).
- Rnd 3-6: 1 sc in each sc of the previous round, worked even. Cut yarn and fasten off at end of last rnd
Ears, legs, tail, topknot:
You will need to make eight pompoms.
- Cut 1 1/2″ wide strip of cardboard
- For each pompom, cut a 10″ long strand of yarn and set it aside
- Wrap yarn around cardboard 150 times
- Using your crochet hook, snake a 10″ long strand of yarn between the cardboard and yarn loops and tie its ends snugly, gathering the strands together
- Cut the loops at the end opposite the tie
- Comb and brush the cut ends to fluff them out. (Be sure to keep a firm grip on the strands as you do this to prevent their being pulled out.)
Collar:
- Cut a strip of black felt 1/2″ wide and long enough to fit snugly around neck + 1/2″.
- With a glue gun or E-6000, glue rhinestones to felt strip.

Finishing:
- Pack the snout with pillow stuffing.
- Sew snout to head.
- Sew button eyes and faux nose, if used, to head.
- For an especially dimwitted look, place eyes close together.
- Sew one pompom to the top of the head and one on either side of the head for ears.
- Pack the head with pillow stuffing.
- Sew the bottom edge of the head to the top of the body
- Sew the pompom legs and tail to the body.
- Attach collar to poodle either by sewing it on or by overlapping its ends around the poodle’s neck and gluing them together.
You’re done! Give your creation a place of honor on the family throne and stand back and admire it. Better yet, take a picture of it and send us a copy. |
 Thanks to the efforts of authors Leah Kramer and Jo Packham, instructions are available for reproducing vintage poodle-shaped toilet paper covers. However, their lesser known cousin, the farting poodle air freshener cover, remains rare as a service to the more demented of our readers, Tacky Living has developed our own version of this classic kitsch craft.


I had made one of these as a gag gift for a co-worker with a flatulence problem. Once people saw it, they all wanted one. And they were all men! 😀
That’s really funny MiniBooger!